# Welcome

Welcome to the Cinematronic Biosignal Platform - Online User Guide.&#x20;

<figure><img src="https://3979900114-files.gitbook.io/~/files/v0/b/gitbook-x-prod.appspot.com/o/spaces%2F28nAE9nE7p2cdi0E6UFg%2Fuploads%2FvgCCh0KhxlzbisC2zfLi%2Fi_ghosted_you_analysis_study_questionnaire%20(1).webp?alt=media&amp;token=35783942-a6d2-4b61-9a73-39b6a830c400" alt="" width="563"><figcaption></figcaption></figure>

The Biosignal Platform, developed by [Cinematronic](https://support.cinematronic.dk/www.cinematronic.dk), helps you see ***when*** and ***where*** your audience reacts to your content, allowing you to improve your product based on actionable insights.

This guide is designed to help you quickly get started with the software, step by step. Get help downloading and installing the software, creating your first project, setting up the hardware sensors, collecting data, and more.

### Jump right in

<table data-view="cards"><thead><tr><th></th><th></th><th data-hidden data-card-cover data-type="files"></th><th data-hidden></th><th data-hidden data-card-target data-type="content-ref"></th></tr></thead><tbody><tr><td><strong>Download and activate Cinematronic Biosignal Platform</strong></td><td>Get started with the basics.</td><td><a href="https://3979900114-files.gitbook.io/~/files/v0/b/gitbook-x-prod.appspot.com/o/spaces%2F28nAE9nE7p2cdi0E6UFg%2Fuploads%2FuCaMjSVqCFFDdNkVdgNL%2Fimage.png?alt=media&amp;token=63001fb7-6fe8-409d-b163-f07142eedf11">image.png</a></td><td></td><td><a href="/getting-started/quickstart">Techincal Requirements</a></td></tr><tr><td><strong>Basics: your first project</strong></td><td>Create your first project and learn the UI basics.</td><td><a href="https://3979900114-files.gitbook.io/~/files/v0/b/gitbook-x-prod.appspot.com/o/spaces%2F28nAE9nE7p2cdi0E6UFg%2Fuploads%2FdOdPUOvhcQUg1p9NaCnj%2Fimage.png?alt=media&amp;token=216a104d-d3aa-4722-a664-8947b8e5b8b9">image.png</a></td><td></td><td><a href="/your-first-project/understanding-the-software-ui">Your First Project</a></td></tr><tr><td><strong>Getting started with eye tracking</strong></td><td>The basics of eye tracking.</td><td><a href="https://3979900114-files.gitbook.io/~/files/v0/b/gitbook-x-prod.appspot.com/o/spaces%2F28nAE9nE7p2cdi0E6UFg%2Fuploads%2F6iMXXM4q3TZSxjZA7G6D%2Fimage.png?alt=media&amp;token=c2d5eca7-5cc4-4f14-981e-8bb855d8043d">image.png</a></td><td></td><td><a href="/eye-tracking/beam-eye-tracker-prerequisites">Eye Tracking</a></td></tr></tbody></table>


# Techincal Requirements

The Biosignal Platform requires specific hardware and software to function effectively, and collecting the necessary biometric data.

### Hardware

**Computer specifications**:&#x20;

* At least 8 GB of RAM.
* A modern processor:
  * 8th generation Intel or newer;
  * AMD Ryzen 5 2600 / Ryzen 7 2700 or newer.
* A dedicated Nvidia GPU or an integrated Intel GPU.
* A working internet connection.
* A Bluetooth adapter.

{% hint style="warning" %}
Note: AMD GPU's, both integrated and dedicated, are not currently fully supported, and might cause visual artifacts.
{% endhint %}

**Sensors specifications**:

* **Biosensors**: Shimmer3 GSR+ Unit, for tracking GSR and PPG (PPG data is algorithmically translated into heart rate). Read more about the Shimmer [here](https://shimmersensing.com/product/shimmer3-gsr-unit/).
* **Eye Tracker**: any modern webcam, at least 720p recording at 60 FPS. The webcam should have a narrow field of view (FOV) of 50-80° for optimal eye and head tracking performance.&#x20;

{% hint style="info" %}
Note: A higher frame rate is more important than higher resolution for eye tracking accuracy.
{% endhint %}

### Software

* Windows 10 or newer.
* A copy of the **Cinematronic Biosignal Platform** with a valid license key. The software can be [downloaded from the Microsoft Store](https://apps.microsoft.com/detail/xpdp1l4lhc980s?hl=en-gb\&gl=DK). For license keys, contact *<sales@cinematronic.dk>* or fill out the form on our [website](https://cinematronic.dk/).
* For eye tracking, a copy of [Beam Eye Tracker](https://beam.eyeware.tech/) with a valid license key. If Beam is installed, the **Cinematronic Biosignal Platform** can automatically use its eye tracking capabilities.


# Downloading and Installing the Cinematronic Biosignal Platform

Follow these steps to download and install the Cinematronic Biosignal Platform on your computer.

### Step 1: Prepare Your System

Ensure that your system meets the technical specifications outlined in [Technical Requirements](/getting-started/quickstart).

### Step 2: Obtain a License Key

The **Cinematronic Biosignal Platform** requires a license key. For sales, contact us at <sales@cinematronic.dk>, or write us using the dedicated form on [our website](https://www.cinematronic.dk/).

### Step 3: Download and Install the software

1. Visit the [Microsoft Store](https://apps.microsoft.com/detail/xpdp1l4lhc980s?hl=en-gb\&gl=DK) and download the software. Downloading the software is free, but using it requires an active license key.&#x20;
2. Click on the Install button to open the Microsoft Store app on the computer > When the popup appears, click on the install button again > Cinematronic Biosignal Platform will start downloading and will automatically install on the system.
3. Click on the Windows Start button. **Cinematronic Biosignal Platform** should appear in the "recently added" list.

{% hint style="info" %}
**Cinematronic Biosignal Platform** is in active development and we release regular updates. Ensure your copy is always updated for the best performance and user experience.
{% endhint %}

### Step 4: First Run and License Key Activation

<figure><img src="https://3979900114-files.gitbook.io/~/files/v0/b/gitbook-x-prod.appspot.com/o/spaces%2F28nAE9nE7p2cdi0E6UFg%2Fuploads%2FxxsyMmxKWO6cXarhIsVF%2Flicense%20actiavation.png?alt=media&amp;token=074bfcea-1fc9-47d6-83fd-5ec57e78512a" alt=""><figcaption><p>License activation panel</p></figcaption></figure>

1. After installation, launch **Cinematronic Biosignal Platform**.
2. You will be prompted to enter your license key to activate the software. **Make sure you have an active internet connection** as the activation requires it.

{% hint style="success" %}
The software will automatically check if the license is valid every time it starts. You do not need to re-enter the license unless it has expired.
{% endhint %}

### Step 5: (Optional) Install Beam Eye Tracker Software

**Cinematronic Biosignal Platform** integrates seamlessly with Beam Eye Tracker to bring advanced eye-tracking to your projects. If you plan to use eye tracking, follow these steps:

1. Purchase, Download and install [Beam Eye Tracker](https://beam.eyeware.tech/get-beam/).
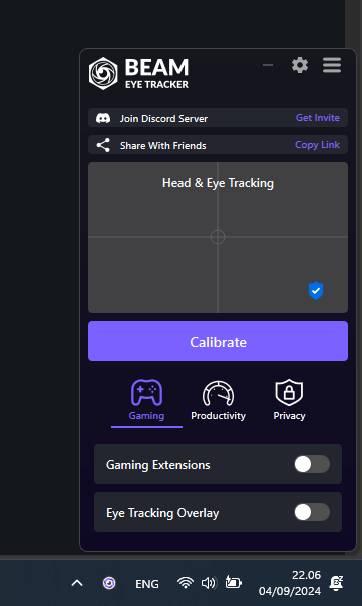
2. Once installed, open the program. The program will open minimised in the bottom corner of the Windows task bar (see picture below).

To setup and calibrate Beam, follow the instructions on the [Beam Eye Tracker: Setup and Calibration](/eye-tracking/beam-eye-tracker-setup-and-calibration) section of this guide.


# Understanding the Software UI

Before exploring more advanced features, let's review the software's general user interface.

### The Structure of the Biosignal Platform

The software is organised into several key "environments," each representing a step in conducting a quality assurance session.

The available "environments" are:

1. **Projects**: Create, open, or delete projects, setting up the foundation for your QA work. Testing: Connect devices, manage respondents (create, delete), select media for testing, and begin the QA tests.&#x20;
2. **Analysis**: Review individual respondent data, add annotations, create surveys, and log data from tests.&#x20;
3. **Results**: Normalise data to compare multiple respondents, making analysing trends and common reactions easier.
4. **Overview**: View an overall summary of the project, including graphical representations of survey results and data charts. Each of these environments is explained in detail on the following pages.

Main Navigation

For now, let's focus on the main navigation, found at the top of the software, disregarding the rest of the interface until later:

<figure><img src="https://3979900114-files.gitbook.io/~/files/v0/b/gitbook-x-prod.appspot.com/o/spaces%2F28nAE9nE7p2cdi0E6UFg%2Fuploads%2FPuhjxJGKuHF421MPJmeC%2Fbasic%20ui.png?alt=media&amp;token=d0f935e3-e584-4710-af1c-8564ea14fea9" alt=""><figcaption></figcaption></figure>

1. **Main Menu**: here, you can read the software license and open source licenses used. In the future, this area will be populated with more settings.
2. **Tab Menu**: navigate between different the different environments of the software, such as  Testing, Analysis, Results, and Overview.
3. **License Status:** displays the current status of your software license and expiration date.
4. **Save Indicator**: allows you to save your progress and view the last save time.


# Creating a Project

Congratulations, you have successfully installed and activated the Cinematronic Biosignal Platform! Let's create your first project and turn user reactions into real, actionable insights!

1. Inside the Biosignal Platform, click on New Project, and select Static Video.&#x20;

{% hint style="success" %}
Currently, **Cinematronic Biosignal Platform** supports only **static video** projects of any length. This is ideal for testing *commercials*, *trailers*, *movie clips, etc*. More types of projects will be available in the future, including **screen capture**, **pictures** and **documents**, or **mixed** projects.
{% endhint %}

<figure><img src="https://3979900114-files.gitbook.io/~/files/v0/b/gitbook-x-prod.appspot.com/o/spaces%2F28nAE9nE7p2cdi0E6UFg%2Fuploads%2FWAwQxGqmtvemrvghUpAC%2Fimage.png?alt=media&amp;token=e443bc9c-efcc-4b13-b002-48bebb6d97b0" alt="" width="563"><figcaption></figcaption></figure>

2. Once named, the project will appear in the **Projects Environment**, where you can select and open it. When opening a new project, make sure to double-check that any previous work has been saved. This is only relevant if a previous project was opened during the same session.
3. Click on the newly created project to open it.


# Setting up the Testing Environment

The Testing tab, also called Testing Environment, is where you can set and manage your user testing sessions. This involves four steps:

1. Selecting the video file to test.
2. Choosing the type of biometric data to collect, and connect the corresponding hardware.
3. Selecting the respondent to test. This is also where you can create new respondents or delete existing ones.

### Start Testing in four Easy Steps

The testing environment is designed to intuitively guide to over the testing process in four steps.

#### Step 1: Selecting the Video to Test

To select the video, click on the "Select Video" button on the top left corner. The Cinematronic Biosignal Platform supports common video formats such as:

* *.mp4*
* *.mkv*
* *.avi*
* *.mov*
* *.flv*
* *.wmv*

<figure><img src="https://3979900114-files.gitbook.io/~/files/v0/b/gitbook-x-prod.appspot.com/o/spaces%2F28nAE9nE7p2cdi0E6UFg%2Fuploads%2FKqwi3617BJTj4EPCLEyg%2Fimage.png?alt=media&amp;token=6e706628-318d-48a5-9b98-27b38859a7a0" alt=""><figcaption><p>The video panel is in the top left corner.</p></figcaption></figure>

To ensure smooth performance, especially on minimum supported hardware, we recommend using video files with a resolution of up to **1080p**. This will prevent any potential lag or performance issues during data collection.

{% hint style="info" %}
**What to do if you can’t select your video:**

1. Check the file name of the video. If it includes special characters (like accents, symbols, or non-English characters), try renaming it with simple letters and numbers.
2. Avoid special characters such as: **@, #, $, %, &, +, é, ü, ç** or any non-standard letters or symbols.
3. After renaming the file, try selecting the video again. If it still doesn’t work, consider moving the file to a simpler directory or folder that doesn’t contain special characters in the path.
   {% endhint %}

#### Step 2: Choosing What Data to Record

In the second step, located in the top right corner of the testing environment, you can select which data to collect, and connect the relevant hardware to the Biosignal Platform .

1. **GSR (Galvanic Skin Response)**: Measures changes in skin conductance, which are linked to emotional arousal. It helps track how engaged or stressed a person is while watching the content.
2. **Heart Rate (HR)**: This is measured using **PPG** (Photoplethysmography), which tracks blood flow changes. Heart rate data gives insights into emotional reactions, such as excitement or calmness.
3. **Eye Tracking**: This shows where participants are looking on the screen, helping you understand which parts of the content grab the most attention.

<figure><img src="https://3979900114-files.gitbook.io/~/files/v0/b/gitbook-x-prod.appspot.com/o/spaces%2F28nAE9nE7p2cdi0E6UFg%2Fuploads%2Ff4moDzILAc1CKDn4gDZk%2Fimage.png?alt=media&amp;token=ad12be58-c196-4820-9691-89ba8863415a" alt="" width="375"><figcaption></figcaption></figure>

#### What You Need:

* **GSR and Heart Rate**: You'll need a **Shimmer device** to record these. Make sure it’s connected and ready to use. See the [technical requirements](/getting-started/quickstart) for more information.
* **Eye Tracking**: This requires the **Beam Eye Tracking** software. View the installation process and requirements [here](/eye-tracking/beam-eye-tracker-prerequisites).

{% hint style="warning" %}
A GSR or HR recording is needed at the moment in order to use the software annotation capabilities. This will be changed and improved in the future.
{% endhint %}

For a detailed guide on how to setup each sensor, jump to the [dedicated section](#conntecting-a-sensor).

#### Step 3: Creating and Selecting Respondents

In the third panel, located in the lower left corner of the testing environment, you can create, select, or delete respondents.

* **Creating a Respondent**: Each respondent must have a **unique name**. This ensures that all data is properly organized and associated with the correct participant.
* **Selecting a Respondent**: During a test, all collected data will automatically be saved under the selected respondent. Be sure to select the correct participant before starting your test.
* **Deleting a Respondent**: If you delete a respondent, all the data linked to that respondent will also be **permanently deleted**.

{% hint style="warning" %}
**Overwriting Data**: If you start a test with an existing respondent who already has data recorded, the new data will **overwrite** the previous data. To avoid this, create a new respondent if you want to keep previous test results.
{% endhint %}

#### Step 4: Review and Start Test

A **progress tracker** at the bottom shows if all steps (video selection, data setup, respondent selection) are complete. If any step is missing, the tracker will indicate it, and the **Start Test** button will remain disabled.

Once all steps are complete, the **Start Test** button will be enabled. Clicking it will start the test, play the video in full-screen mode, and record the selected biometric data in the background.

<figure><img src="https://3979900114-files.gitbook.io/~/files/v0/b/gitbook-x-prod.appspot.com/o/spaces%2F28nAE9nE7p2cdi0E6UFg%2Fuploads%2F1REJ5cagU4L49WIUt1Pu%2Fimage.png?alt=media&amp;token=dd637b3b-6f56-41fb-97d5-b15b053cba66" alt="" width="375"><figcaption></figcaption></figure>

### Connecting a Sensor

#### 💙 Connecting a Shimmer Device

For detailed instructions on how to set up the Shimmer hardware itself, [click here](/gsr-and-ppg-heart-rate/shimmer3-gsr+-prerequisites) to follow the guide.

* In the Biosignal Platform , in **connection settings**, select whether you want to record **GSR**, **Heart Rate**, or both.
* Ensure the Shimmer device is charged and turned on and that **Bluetooth** is enabled on your Windows device.

{% hint style="info" %}
The Shimmer device has to be paired in Windows settings at least once, before connecting it to the Cinematronic Biosignal Platform. Consult the [full guide](/gsr-and-ppg-heart-rate/shimmer3-gsr+-connecting-and-pairing-with-windows) for details.
{% endhint %}

* **Take note of the device ID** located on the back of the Shimmer device and i**nsert the  code** in the appropriate field; click **Connect**.
* Once the connection is established, **real-time data** will start displaying in a graph within teh software, showing the participant’s biometric responses.
* Attach the sensors to the respondent’s hand. For more details on proper sensor placement, refer to the full guide.

#### 👁️ Connecting to the Beam Eye Tracking Service

For detailed instruction on how to set up the Beam Eye Tracking software, [click here](/eye-tracking/beam-eye-tracker-setup-and-calibration) to follow the guide.&#x20;

* In the Biosignal Platform , in **connection settings,** select the eye-tracking option. Doing so will reveal the **Connect Beam Eye Tracker** button.

<figure><img src="https://3979900114-files.gitbook.io/~/files/v0/b/gitbook-x-prod.appspot.com/o/spaces%2F28nAE9nE7p2cdi0E6UFg%2Fuploads%2FxUZCF1ky7MFN77CvNQKU%2Fimage.png?alt=media&amp;token=0ae63083-b048-4c28-b53d-417764cba028" alt="" width="293"><figcaption></figcaption></figure>

* Ensure that the Beam software itself is installed, open, and with a valid license, and that the **Gaming Extensions** option is turned on. This give the Biosignal Platform the option to communicate with the Beam service. <br>

  It is recommended to run the full calibration in Beam before each test by clicking on the **Calibrate** button and following the on-screen instructions.

<figure><img src="https://3979900114-files.gitbook.io/~/files/v0/b/gitbook-x-prod.appspot.com/o/spaces%2F28nAE9nE7p2cdi0E6UFg%2Fuploads%2FPe5p0aLnp0KDjZQT0yff%2Fimage.png?alt=media&amp;token=3e052881-cb9d-4ff7-b9e0-47a6a084f88e" alt="" width="197"><figcaption></figcaption></figure>

* Back in **Cinematronic Biosignal Platform** , click on Connect Beam Eye Tracker. If the connection is successful, a green marker will appear. \
  If you cannot connect to Beam Eye Tracker in **Cinematronic Biosignal Platform** , try toggling the Gaming Extension option in Beam Off and On.\
  \
  You can then test the calibration by clicking on Toggle Eye Tracking Overlay. If the calibration appears inaccurate, you can attempt the quick calibration option in **Cinematronic Biosignal Platform** or the full calibration option in Beam.

<figure><img src="https://3979900114-files.gitbook.io/~/files/v0/b/gitbook-x-prod.appspot.com/o/spaces%2F28nAE9nE7p2cdi0E6UFg%2Fuploads%2F5OovgrsqufY5rNVeydeM%2Fimage.png?alt=media&amp;token=cca86220-ce5e-487f-8a09-4e16e85a3d3a" alt="" width="563"><figcaption><p>The green full circle marks a successful connection. The yellow circle outline shows the current eye-tracking coordinates.</p></figcaption></figure>

* The eye-tacking sensor is now correctly connected!


# Creating a Questionnaire

This section illustrates how to design in-software questionnaires and gain a better understanding of your  data.

Quantifying qualitative data can save significant time and make the study more comparable across respondents. The Biosignal Platform has a built-in **Questionnaire Maker** which will help you achieve just this.

### Creating and Designing Questionnaires

To create a questionnaire, you must head to the Analysis tab.

Questionnaire are project-dependent. That means that you can have one questionnaire design per study. Questionnaire answers, on the other hand, are individual for each respondent.

{% hint style="info" %}
&#x20;In the future, this will be moved to the Testing tab for a better user experience
{% endhint %}

#### **Step 1: Select the Analysis Environment**

* In the **Analysis** panel, next to Respondent Info, click the Questionnaire tab.
* At the bottom of this tab, click on **+ Add Questions.** The Questionnaire Builder panel will appear.

#### Step 2: Navigating the Questionnaire Builder

In the **Questionnaire Builder**, you can define question **Categories** and add individual questions to capture respondents' reactions.

* Each question can be customized by selecting one of the following **Question Types**:
  * **Short Answer**: A single-line text box for brief responses.
  * **Paragraph**: A larger text box for more detailed responses.
  * **Number**: Input a specific numerical value.
  * **Dropdown**: A menu that allows selection from predefined options.
  * **Single Choice**: Choose one answer from a set of predefined choices.
  * **Multiple Choice**: Select multiple answers from a list of predefined options.
  * **Linear Scale**: Rate something on a scale (e.g., 1 to 10) to measure opinions or levels.
* For every question, you can add a **Description** to clarify its purpose or provide additional instructions.
* For certain question types, such as **Linear Scale** questions, specify the **Minimum** and **Maximum values** (e.g., "1" for least and "10" for most) and add descriptive labels for clarity (e.g., "The least" to "The most").
* When you've finished adding questions, click **Apply** to save the questionnaire design. These changes will be applied throughout the study, impacting all respondents' questionnaires.

{% hint style="danger" %}
Changing the questionnaire structure during the study will affect existing data that has already been recorded. It’s advisable to finalize the survey design survey designs before the start of the study.
{% endhint %}

#### **Step 5: Filling in Questionnaires for Respondents**

* After creating the questionnaire, select a respondent. The questions will now appear in the questionnaire tab.
* Input each respondent's responses based on the analysis phase of the study.&#x20;

{% hint style="warning" %}
Unless your study requirements say otherwise, avoid allowing the respondents to complete the questionnaire themselves. Doing so will allow them to view their biometric reaction, potentially influencing the results.&#x20;

In a future update, we plan to move the questionnaire answering from the Analysis environment to to a separate tab, allowing respondents to answer independently.
{% endhint %}

### Viewing Questionnaire Results

To view the results of your questionnaire, head to the **Overview** environment in **Cinematronic Biosignal Platform**.

The software will automatically show the right type of graph depending on the type of question:

* For **numerical or scale questions**, the software automatically generates appropriate graphs and charts to help you easily compare responses across all participants.
* **Open-ended questions** can't be directly quantified, but Cinematronic Biosignal Platform uses **AI technology** to create summaries of different responses, grouping similar answers to give you a clear overview. This is an optional feature.


# Analysis Environment: analysing individual users

The **Analysis Environment** in Cinematronic Biosignal Platform is where you review and annotate individual respondents' reaction to the stimuli. This section explains each component of the Analysis Environment and how to effectively use its features to understand the viewer reaction based on the  respondents' GSR, heart rate (HR) data, and eye-tracking.

### **Understanding the Analysis Environment UI**

<figure><img src="https://3979900114-files.gitbook.io/~/files/v0/b/gitbook-x-prod.appspot.com/o/spaces%2F28nAE9nE7p2cdi0E6UFg%2Fuploads%2FrPQ2MxNx6kmKOpzeHyLO%2Fanalysis_environment.png?alt=media&amp;token=24d9fd43-5dcc-4f45-b6c1-2455ee6cb074" alt="" width="563"><figcaption><p>View of the Analysis environment. </p></figcaption></figure>

The **Analysis Environment** is structured as fallows, based on the image above:

1. **Respondent Info & Questionnaire:**

   This section on the left side of the screen allows you to manage the respondent's metadata and qualitative feedback:&#x20;

   1. *Respondent Info Tab*: Displays key respondent details such as Name, Age, Gender, and other metadata.&#x20;
   2. The *Questionnaire Tab* allows the analyst to input or review responses to a custom questionnaire designed for the respondent. You can add or modify questions by clicking + Add Questions, tailoring each question to your study needs.\
      \
      To learn how to use and navigate the questionnaire maker, you can follow [this guide](/your-first-project/creating-a-questionnaire).

2. **Video Playback & Eye Tracking:**

   This section contains the video playback, and also displays the gaze point of the selected respondent, if eye tracking data was collected.

   1. **Open Video Window**: This option opens the video in a separate, larger window for a more detailed view. You can use this feature to ask specific question to respondents and showing them a specific section of the video, without revealing the rest of the data to them.<br>

3. **Comments and Annotations:**\
   The Comments and Annotations allows to leave time-stamped comments and observations. Each comment can be colour coded to your needs. Colour coded comments appear on the GSR graph at the bottom of the screen.&#x20;

{% hint style="info" %}
**Pro Tip 1:**\
You can use the colour coded annotation feature to label specific reactions or immersion level. By doing so, in the Results environment you can view a gradient-like visualization of emotional or physiological of multiple selected respondents.
{% endhint %}

4. **GSR Offset Adjustment:**\
   GSR (Galvanic Skin Response) delay is the natural physiological delay between when a stimulus is presented and when the body's skin conductance reflects a measurable response. This delay results from the time it takes for the body to register a stimulus and trigger a reaction, such as increased emotional arousal. \
   \
   Typically, the delay averages around 2.5 seconds, though it can vary depending on the individual and the intensity of the stimulus.\
   \
   The software provides a manual GSR Offset adjustment feature to account for this delay. GSR offsets are unique for each individual respondent. Click **Apply** to lock and save the GSR offset for the current respondent.

{% hint style="info" %}
**Pro Tip 2:**\
To calibrate this delay, consider including a strong, clear stimulus (such as a loud sound or sudden visual) toward the end of the video. You can then adjust the offset by visually matching the peak in GSR with the stimulus in the video.
{% endhint %}

5. **GSR and HR Data, and comment annotation bubbles**\
   The GSR and HR graph is at the bottom of the Analysis Environment, which presents the respondent's Galvanic Skin Response (GSR) and Heart Rate (HR) data over time.

   1. **GSR (µS)**: Displayed on the **left Y-axis** (represented by a blue line), the GSR data measures changes in skin conductance, which reflect levels of emotional arousal or stress.
   2. **HR (bpm)**: Displayed on the right Y-axis (orange line), heart rate is derived from the PPG signal registered by the Shimmer device. Some smoothing is applied to the curve.
   3. **X-axis (Time in seconds)**: The horizontal axis represents time.<br>

   In addition, **comment annotation bubbles** are represented as color-coded icons on the graph.

{% hint style="info" %}

#### **Saving Data**

At the of each environment, you will find a **Save Data** button. We recommend saving your progress regularly. The program does not auto-save.
{% endhint %}


# Beam Eye Tracker: Prerequisites

This page described the perquisites necessary to ensure Beam Eye Tracker correctly works with the Cinematronic Biosignal Platform.

### Hardware Requirements

Cinematronic recommends adhering to the hardware requirements specified in the [Technical Requirement](/getting-started/quickstart) page. This ensures that both the Biosignal Platform and Beam Eye Tracker work well in tandem.&#x20;

### Supported Beam Eye Tracker Versions

Cinematronic does not develop or maintain Beam Eye Tracker. We have tested and confirmed that the following versions are compatible with **Biosignal Platform** .

* v2.2.1 (latest version)
* v2.2.0
* v2.1.1

### ⬇️ Download and Install Beam Eye Tracker Software <a href="#step-5-optional-install-beam-eye-tracker-software" id="step-5-optional-install-beam-eye-tracker-software"></a>

A copy of Beam Eye Tracking must be purchased separately. Beam is available either as a lifetime or monthly license.

1. Purchase, Download and install [Beam Eye Tracker](https://beam.eyeware.tech/get-beam/).
2. Once installed, open the program. The program will open minimised in the bottom corner of the Windows task bar (see picture below).

To setup and calibrate Beam, follow the instructions on the [Beam Eye Tracker: Setup and Calibration](https://support.cinemetrics.cinematronic.dk/eye-tracking/beam-eye-tracker-setup-and-calibration) section of this guide


# Beam Eye Tracker: Setup and Calibration

This page describes the process of setting up and using the Beam Eye Tracker software with The Cinematronic Biosignal Platform.

{% hint style="info" %}
Beam Eye Tracker is a software developed by [Eyeware Tech](https://eyeware.tech/) and it is not maintained or provided by Cinematronic. Cinematronic only provides the integration of the software with the Biosignal Platform .
{% endhint %}

1. Download and install Beam Eye Tracker ([guide](/getting-started/publish-your-docs#step-5-optional-install-beam-eye-tracker-software)) ([download link](https://beam.eyeware.tech/get-beam/)). You will need to create a free account with Eyeware, and purchase the affordable Beam software license. Once installed, open the program.

<figure><img src="https://3979900114-files.gitbook.io/~/files/v0/b/gitbook-x-prod.appspot.com/o/spaces%2F28nAE9nE7p2cdi0E6UFg%2Fuploads%2FQqgtQNZpK3idgQNaoGGF%2Fimage.png?alt=media&amp;token=47e10cec-e6d7-4a70-b55d-a0fd28e4ae50" alt="" width="272"><figcaption></figcaption></figure>

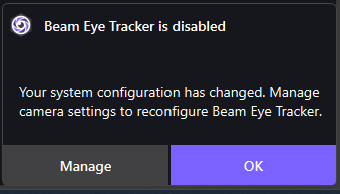
2. Click on the Beam icon. You might be asked to select your camera, resolution, frame rate, and angle. Check the [**technical requirements**](/getting-started/quickstart) for the best hardware combination.

<figure><img src="https://3979900114-files.gitbook.io/~/files/v0/b/gitbook-x-prod.appspot.com/o/spaces%2F28nAE9nE7p2cdi0E6UFg%2Fuploads%2Ft9grkWFKwdCO4Gr76R0d%2Fimage.png?alt=media&amp;token=7b8c2485-a7fa-4a59-9ef4-6c7961df8a47" alt=""><figcaption><p>If the above popup appears, click on Manage and ensure your settings are correctly selected and saved.</p></figcaption></figure>

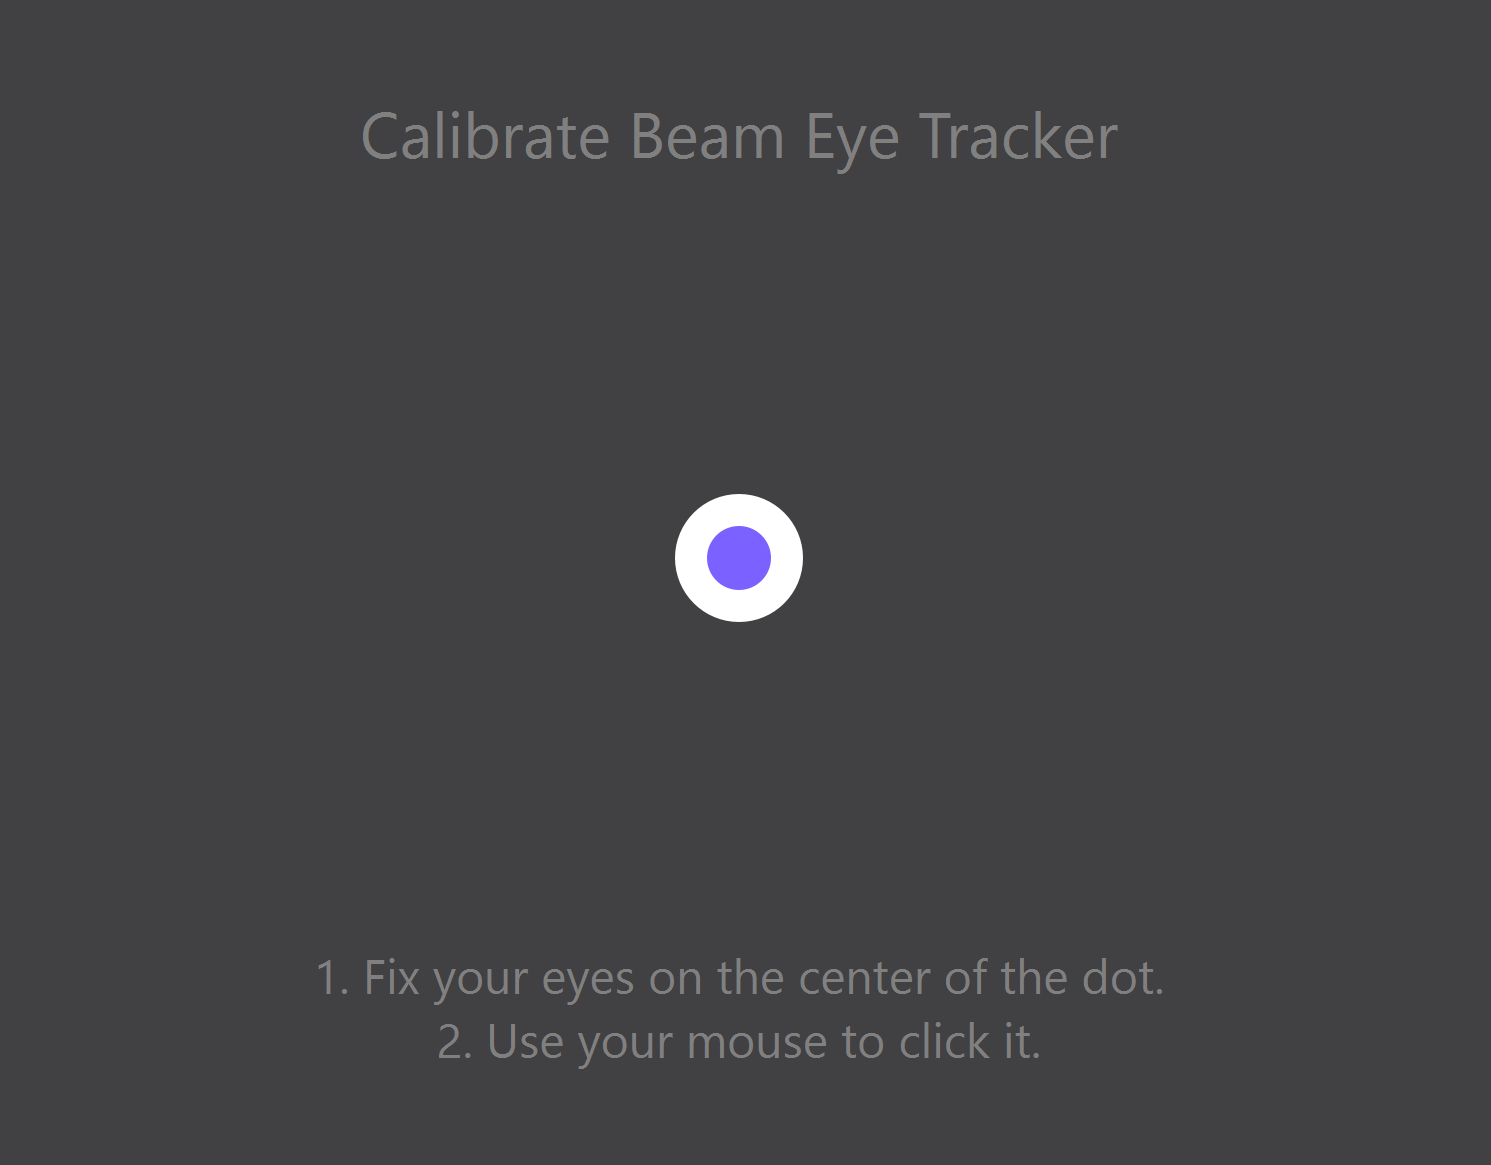
4. Start the full Beam calibration process by clicking on the *Calibrate* button, and follow the process.&#x20;

<div data-full-width="false"><figure><img src="https://3979900114-files.gitbook.io/~/files/v0/b/gitbook-x-prod.appspot.com/o/spaces%2F28nAE9nE7p2cdi0E6UFg%2Fuploads%2F1bz6UQKnyiszn4LFrXjt%2Fimage.png?alt=media&amp;token=c027ecd2-8c40-416e-8723-233f3cf72c31" alt="" width="375"><figcaption><p>Follow the instructions to complete the calibration process.</p></figcaption></figure></div>

{% hint style="warning" %}
It is recommended to run the full calibration process between each respondent in a study, and between sessions, to ensure the maximum accuracy.
{% endhint %}

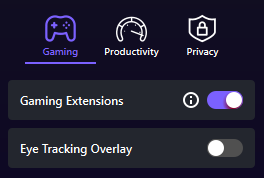
4. In the Beam main panel, ensure that Gaming Extensions is enabled and that Eye Tracking Overlay is disabled. This will enable the Biosignal Platform to communicate with the eye tracking server.

<figure><img src="https://3979900114-files.gitbook.io/~/files/v0/b/gitbook-x-prod.appspot.com/o/spaces%2F28nAE9nE7p2cdi0E6UFg%2Fuploads%2FviVpUczl2UHWEMwoHcIV%2Fimage.png?alt=media&amp;token=d532a22a-33bd-4988-b37b-6d9ff05ae73d" alt=""><figcaption><p>Settings to allow Beam to communicate with the Biosignal Platform </p></figcaption></figure>

{% hint style="success" %}
Despite the name, Gaming Extensions is not confined to video games. The option allows programs like the Cinematronic Biosignal Platform to pull the data from Beam and integrate eye-tracking capabilities.
{% endhint %}

5. Close the window by clicking outside the bounding box, or again on the Beam icon.&#x20;

You are now ready to use the eye tracking integration in Cinematronic Biosignal Platform with a wide range of webcams!


# Shimmer3 GSR+: Prerequisites

This page outlines the necessary requirements to ensure the Shimmer3 GSR+ Unit works correctly with the Cinematronic Biosignal Platform .

#### What is the Shimmer3 GSR+ Unit

The Shimmer3 GSR+ Unit is a wearable device that measures Galvanic Skin Response (GSR), also called Electrodermal Activity (EDA). It captures skin conductance changes due to sweat gland activity, reflecting emotional arousal and cognitive responses.&#x20;

The device also measures Photoplethysmography (PPG), the blood volume changes in the skin. The Cinematronic Biosignal Platform uses an algorithm to translate PPG signals into heart rate (HR) for extended physiological monitoring.

<figure><img src="https://3979900114-files.gitbook.io/~/files/v0/b/gitbook-x-prod.appspot.com/o/spaces%2F28nAE9nE7p2cdi0E6UFg%2Fuploads%2Fo5lWyJo8Mcr1t5KX2l0N%2Fshimmer%20on%20a%20hand.png?alt=media&amp;token=b1487eb6-8d12-4e47-a82f-f31a7c6731ba" alt=""><figcaption></figcaption></figure>

### Hardware Requirements

Cinematronic Biosignal Platform supports the Shimmer3 GSR+ Unit with firmware v1.12 and above.&#x20;

The following accessories are required:

* Finger electrodes (supplied with the unit)
* Electrodes straps, such as one of the types listed below:
  * Finger clamp (purchased separately).  Recommended for the Biosignal Platform .
  * Velcro straps (supplied with the unit). While they are well suitable for tests, they can be uncomfortable to wear.
  * Adhesive pads  (supplied with the unit). They tend to be the most accurate at registering data, but they are the most invasive to apply.
* A compatible Windows computer with a Bluetooth connection. See the software's [technical requirements](/getting-started/quickstart).&#x20;

The Shimmer2 GSR+ unit can be purchased on the supplier's [official webshop](https://shimmersensing.com/product/shimmer3-gsr-unit/).

### Software Requirements

The Shimmer3 GSR+ Unit does not require additional software to work, other than the software itself.


# Shimmer3 GSR+: Connecting and Pairing with Windows

This section explains the process of pairing the Shimmer3 GSR+ Unit with a Windows PC.

**Step 1: Power On the Shimmer3 GSR+**

* Ensure the Shimmer3 is fully charged and operational. You can charge the Shimmer3 GSR+ using the built-in charging dock. Then, power on the device using the button located on the side.

{% hint style="info" %}
The docking unit used for charging can also be used to update the firmware if needed by following the manufacturer’s instructions. Only update the firmware if absolutely needed.
{% endhint %}

#### Step 2: Enable Bluetooth on Your PC

* Ensure Bluetooth is enabled on your Windows 10 or Windows 11 PC. You can check the Bluetooth Status by navigating to **Settings** > **Bluetooth & Devices.**

**Step 3: Adjust Bluetooth Discovery Settings (Windows 11 only)**

Windows 11 defaults to showing low-power Bluetooth devices only. You must turn on the advanced discovery option to allow Windows 11 to discover and connect to the Shimmer3 GSR+, which uses the standard Bluetooth protocol.

* Navigate to **Settings** > **Bluetooth & Devices** > **Devices,** or click [here to open Windows Settings](ms-settings:bluetooth).
* Scroll down, and change the "*Bluetooth devices discovery*" option from ***Default*** to ***Advanced***.

<figure><img src="https://3979900114-files.gitbook.io/~/files/v0/b/gitbook-x-prod.appspot.com/o/spaces%2F28nAE9nE7p2cdi0E6UFg%2Fuploads%2FwJlRR6qgmgBHL07xsv7K%2Fadvanced%20bluetooth%20windows%2011.png?alt=media&amp;token=cfd2135b-6111-4ac2-8e98-3b1861470f13" alt=""><figcaption></figcaption></figure>

#### **Step 4: Pair the Shimmer3 GSR+ to Windows**

Bluetooth devices must be paired to your computer to be fully operational. This procedure is often done one time per device. To pair the Shimmer device to Windows:

* Navigate to **Settings** > **Bluetooth & Devices** and click on **Add Device.**
* Select **Bluetooth.**
* Wait for the Shimmer3 GSR+ to appear in the list of available devices, then select it.
* When prompted, enter the pairing code. This code is printed on the back of the Shimmer3 GSR+ Unit. Note: This code is unique and fixed for each device.

Once pairing is complete, the Shimmer3 GSR+ should appear under Paired Devices in your Bluetooth settings. Cinematronic Biosignal Platform can now establish a connection with the Shimmer. To learn how to connect the software to the Shimmer, follow the guide from the section [***Setting up the testing environment***](/your-first-project/setting-up-the-testing-environment).